Showing posts with label Christmas. Show all posts

Wednesday, December 28, 2011

Crafty Christmas part 2: Glass Etching!

I finally broke down and joined Pinterest a couple weeks ago, and I have become obsessed with finding craft ideas on there. Pinterest is where I got the idea for my brother's present: glass etching! Sounds scary and impossible, but it's actually very easy. I decided to etch a casserole dish, and I wrapped it with a collection of favorite family casserole recipes... I figured that three busy guys living in freezing Chicago might like some comfort food for dinner on cold, snowy nights. Plus, they can make a casserole in advance and freeze portions for nights when they're too busy to cook. In retrospect, I'm not sure if my brother's French roommate eats casserole... his side of the fridge/freezer is full of filets and fois gras... but hey, it never hurts to try new things!
To practice etching before I made the casserole dish, I tried it on an olive oil bottle... so my photos below go back and forth from casserole to bottle. Sorry about that. I didn't take as many pictures as I wanted because I was afraid of getting etching acid on my new iPhone.
To do this project, here is what you need:
  • Glass to etch (The instructions on the etching acid warn that it won't work on all Pyrex dishes; however, the casserole dish I used is Pyrex and it worked fine. Also, I had a few smaller items that I did test runs on before I started on the casserole dish, just so I could figure out how long the acid needed to sit on the glass.)
  • Small paintbrush (you'll throw it away when you're finished, so make sure it's not a good one)
  • Rubber gloves
  • A bottle of Armor Etch (costs about $20 at Hobby Lobby... sounds expensive, but it's a big bottle and you can etch a lot with it!)
  • Stencils and masking tape (They sell special letter stencils specifically for glass etching, but they are expensive, around $10 for a pack. They were also really small. I bought stick-on poster letters instead, and I used the extra paper around each letter to make my own stencils for about $3.)
First, place your design on the bottle and use masking tape around the edges to make sure it's stuck on there really well.


Using the small brush, paint a thick layer of Armor Etch inside each letter. Make sure you wear gloves while doing this! The bottle warns that Armor Etch can cause burns on your skin that aren't always immediately apparent. That doesn't sound pleasant.


The bottle says to let the Armour Etch sit for 60 seconds. I did that on a sample glass jar, and the etching is barely visible. For the olive oil jar, I let the acid sit for 5 minutes, and for the casserole dish I waited 10 minutes. I highly recommend waiting at least 5 minutes before rinsing.

Rinse the stencils and glass thoroughly under the faucet (still wearing gloves). Then peel the stencils off and admire your work!

Just so we're clear, this says "kickasserole." It's a little joke that my brother and I have...


It says "olio," which is oil in Italian
 These pictures don't really show how cool the glass etching looks, but I promise it's an extremely easy technique and it looks quite impressive.
I can't wait to make some monogrammed wine glasses--that would be a great gift!

Tuesday, December 27, 2011

Crafty Christmas: Yarn Wreaths!

This was a great Christmas! I can't put my finger on what exactly made this Christmas so wonderful... I think it was just the combination of family time, friend time, and not too much shopping... I am so blessed to have such wonderful friends and family. I know that year-round, but what better time than Christmas to reflect on how much love I have for the people in my life...

So, as I mentioned before, my goal this year was to make all of my Christmas gifts. Mission accomplished! Well actually, that's not true. In addition to handmade gifts, I also gave donations to SOS in honor of my parents and brother. I'm not writing about this to brag--instead, hopefully I can inspire others to give similar gifts! Anyway, I tried my best to take pictures of the gift-making process so that I could document it all here on my blog. Today I am going to post pictures of all the wreaths I have made in the past couple weeks. I posted a picture last week of the Memphis Tigers wreath I made for a friend... Here is a picture of my original argyle wreath, a Detroit Tigers wreath that I gave my dad for Christmas:
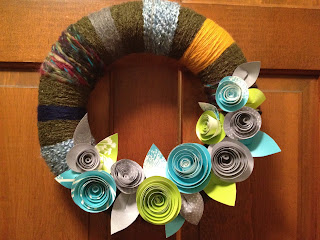
Yarn wreaths are really easy to make, and incredibly inexpensive, but they are a little bit time-consuming. I start by wrapping a straw wreath (anywhere from 10 to 14 inches, all costing under $5) a couple times around with whatever yarn I have on hand. I have a ton of yarn left over from old knitting projects, so I've been using a lot of that. If I have to buy yarn, I usually buy the "I Love This Yarn!" brand at Hobby Lobby because it is cheap and it comes in lots of pretty colors.
Straw wreath wrapped in yarn. I made a little loop at the top for hanging.

For the argyle pattern, I measured the circumference of the wreath, did some quick math to figure out how many diamonds would fit around the wreath, and then made a diamond stencil out of a scrap of paper. I cut diamonds out of felt and hot-glued them around the wreath.


Lay the diamonds out before gluing them, just to make sure they fit. I keep ending up with one extra, but the rest fit perfectly... just a mystery, I guess.
 Choose a contrasting color of yarn for the argyle stripes. Glue the yarn to the back of the wreath...

...and wrap the yarn around the wreath in one direction, making sure the yarn passes through the center of each diamond. Glue the end of the yarn on the back of the wreath.


Then do the same thing again, but wrap the yarn in the other direction so that it makes an X on each diamond. I covered the ends of the gray yarn with a scrap piece of felt, just so it looks neat... not like it matters, since it's on the back of the wreath, but I'm an OCD crafter :)

Finished argyle!
 To make this a "manly" wreath for my dad, I sketched a stencil of the Detroit Tigers logo, traced it onto orange felt, and cut it out. I'm pretty sure that sketching a Tigers logo that actually looks like the Tigers logo is the highlight of my crafting career. I'm super proud.
Then I painted both sides of the felt with ModPodge to stiffen it, let it dry overnight, and hot glued it to the corner of the wreath.
Dad seemed pretty excited about his manly wreath! He has been bugging me for a while to make a wreath for his office, but I don't think he expected me to actually do it. When he found out I was making all of my gifts, I could tell it was driving him crazy trying to figure out what I was planning to make for him. Along with the wreath, I made him some coasters with Frank Lloyd Wright prints on them, but I'll post pictures of those later.
Here are a few more wreaths I made for Christmas:

I made this for fun one day, and it ended up in mom's kitchen. She got a bonus gift, I guess!

 
I made this one for my grandma, using scraps from old knitting projects.


This one might be my favorite. I made it for my friend Butler who loves black, pink, and tie-dye...

To make the little paper pinwheel things, I cut two strips of paper, folded them like an accordion, and glued the ends together...
 
Make sure the strips of paper are the same width. This one is about an inch.
 Then I pushed the edges little accordion circle together, hot glued the center, and held it in place until the glue dried.
 
I covered up the messy hot-glue centers with little paper circles.
This is how I wrapped the wreath--recycled an old grocery bag, and decorated it with leftover yarn and paper!
I hope you all had a truly marvelous Christmas! I can't wait to share more of the fun gifts I made. Check back for more pictures and instructions for making coasters, etching glass, and the personalized last-name framed art I created for my mom.

Friday, December 23, 2011

"Maybe Christmas," he thought, "doesn't come from a store..."

I just realized that it's been almost a month since I wrote anything... December gets so busy! I've been on Christmas break for a week, and tonight is the first chance I've had to just sit on my couch and enjoy some peace and quiet (although I have some craft projects drying on the porch, so I can't get comfy here on the couch for too long).

This year at church, our awesome youth ministry staff has been encouraging the students to consider an alternative approach to Christmas. We talked one Sunday night about an organization called Advent Conspiracy, which encourages a simpler approach to Christmas. Presence, not presents. Give to those in need. Give handmade gifts. Don't be crazy holiday consumers. I love ALL of those ideas. So I decided to adopt some Advent Conspiracy ideas this year. Namely, I decided to make all of my Christmas presents. Yes, all of them. It's funny--when I mention this to people, I usually get a laugh and some cynical comment like, "it must be nice to have that much free time!" Well yes, I admit that as a teacher I have more time off around the holidays than many other people do. But look--it's after midnight and I'm still up, waiting for a coat of spray paint to dry! My response is usually something like, "all that time you spend shopping... that's the time I'm spending making things." It's true, but I still get a lot of weird, when-did-you-become-a-hippie looks.

I have finished almost all of my gifts. I've delivered a few of them already. And I have been documenting the whole process on my iPhone. Once all the gifts are given, I'll post plenty of pictures!

Some thoughts on my alternative Christmas:
-It is exhausting. And it takes a LOT of time. But the only holiday shopping I've done this year has been at Hobby Lobby and Target, buying supplies. I absolutely love not dealing with crazy Christmas shoppers.
-I'm saving money. I made three gifts for friends the other day, and all of them were free! I used supplies I already had around the house!
-I discovered Pinterest at a very opportune time. I already had some ideas of things I could make, but thanks to Pinterest I have learned so many new skills! And wow, there are so many ways to "upcycle" old t-shirts!
-I am giving fewer gifts this year. I hope everyone is okay with that. Well, actually, I don't care if everyone is okay. I have never been more excited to see my family members open their gifts. Each gift was carefully thought out, and I tried to create things that I knew they needed or would love... so much better than just buying sweaters for everyone!
-I also decided not to buy wrapping paper. It seems crazy and so wasteful to spend all that money on paper that will just end up in a bag on the curb by mid-morning on Sunday. So I'm using old grocery bags, brown packing paper, yarn, and permanent markers to wrap and decorate my gifts. Again, it's time consuming... luckily White Christmas is always on TV, so I have something to watch while I wrap.

I can't wait to post pictures of all the gifts I've made... but until they're all opened, I'll just have to wait! I did deliver a gift today--a Memphis Tigers wreath, for a Tiger-loving friend. I branched out of my usual paper-rose wreath design and tried to make something a little manlier than roses... tiger print argyle! He said he liked it... but he also said he wants to hang it where he can throw a basketball through it. Maybe I should have hot-glued a net on the bottom... Here's a photo:

I hope you all have a wonderful Christmas weekend with your family and friends.